
Formatted Text module
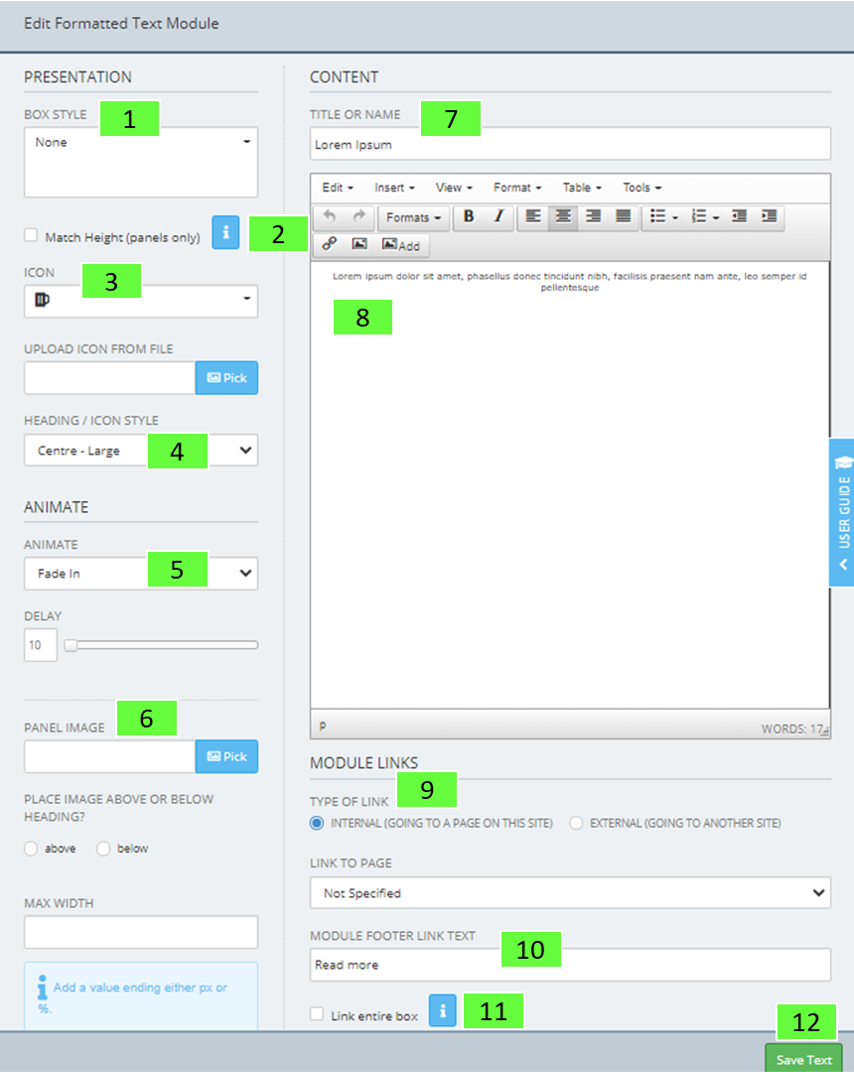
- Box Style
Allows you to apply a box style if available. This is specified on the website design
- Match Height
You can apply this to several panels on a page to ensure they are all the same height. This does not account for the footer link at the bottom of a box, so either all or none of the boxes should have footer links. It is currently only usable on box styles with 'panel ' in the name
- Icon
Adds an icon next to the title – choose from one of the existing icons or upload your own
- Heading / Icon Style
Choose how the heading or icon is displayed: left, right, centre small or large
- Animation
Adds an animation to the module which occurs at the time of the page loading. You can determine the delay for when this occurs using the delay slider eg. 1 second after page load
- Panel Image
Pick an image from the resource library to display within the Formatted Text module. You can choose if you want this displayed above or below the heading. A max width can be specified here in pixels or percentage
- Title or Name
The name or title of the module. If filled in, the name appears as a title to the piece of content on the page
- Text Edit Area
Where you can add text, images and links. Please see the Using the Text Editor section for more information
- Module Links
Allows you to add a link at the bottom of the module, either to a page within your website (internal) or another website (external)
- Module Footer Link Text
Allows you to customise the text for the link in the footer of the module
- Link Entire Box
If this is ticked the entire box will be clickable and head to the link specified above
- Remember to Save Text
Publish Settings
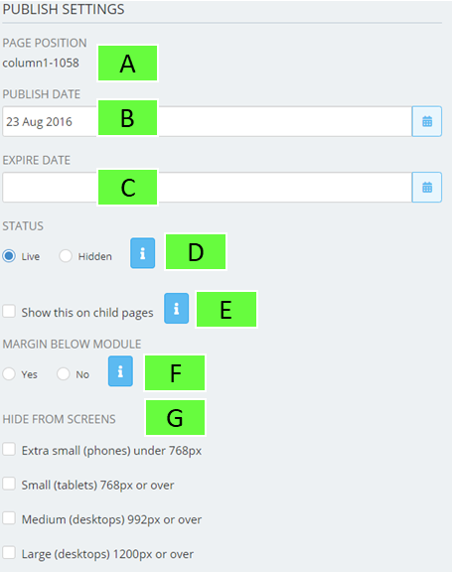
- Page Position
Which column the current module is located
- Publish Date
Choose when this content goes live or put in retrospectively
- Expire Date
Choose when this content expires from the live website, it will still be available in admin mode
- Status
Set this to live if you would like to make the module visible to everyone who visits your website or set it to hidden if you would only like it to be seen by people logged into the admin system
- Show This On Child Pages
This will make the module visible on all the sub pages below the current page. In order to make a module display on every page, add it to the home page and tick the box next to show this on child pages
- Margin Below Module
By default modules have a margin below them. If you would like to remove this for this module, please select "no"
- Hide From Screens
This allows you to target a module to certain screen sizes. For example, if you want a module to be visible only on a mobile phone, tick the boxes next to small, medium and large
Using the Text editor
Here you can type in new text, delete or cut, copy and paste. Using the text editor is a little like Microsoft Word although here you'll be editing HTML, so the control you have is more basic.
Copying and Pasting
When pasting in text care must be taken in how you paste. Pasting in directly from an email or word processing application will carry in unwanted formatting.
To paste text head to Edit [1] and Paste as text
Caution : if you leave the FORMATTED TEXT edit area open for more than 12 minutes, as a security feature you'll be logged out before you can save. This will lose your changes. It's better to write your text in an application such as MS Word and then copy in, rather that composing directly into the editor. If you lose track of time and are logged out before saving, your text will be lost. It has to be this way to keep your site secure.
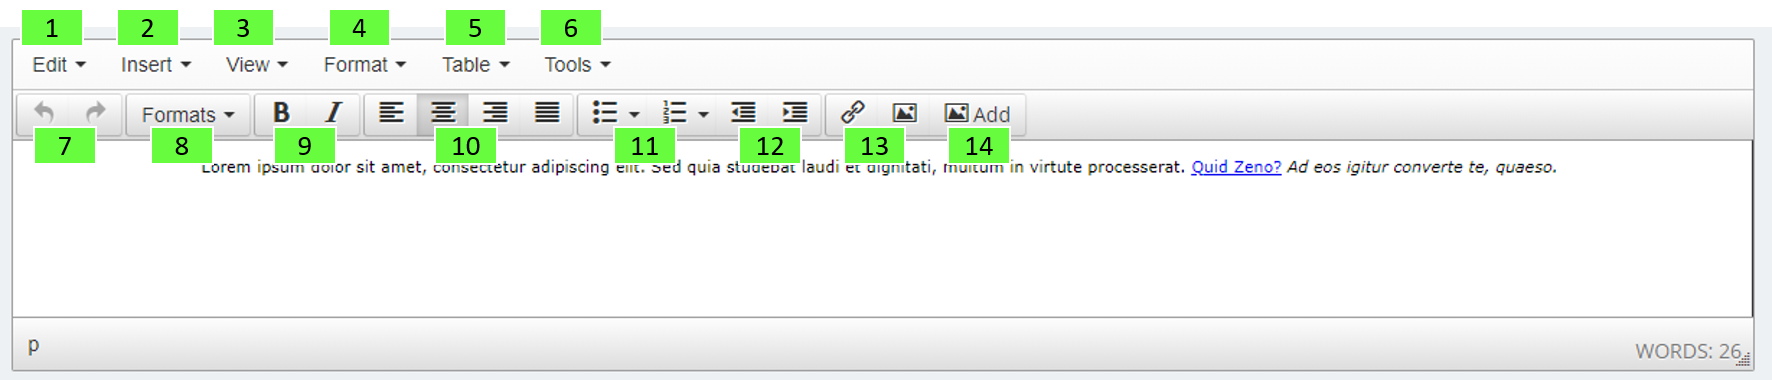
- Edit
Undo or Redo your last change. If text is selected you will be able to cut, copy, paste and paste as text (which removes formatting). You can also select all and perform a find and replace
- Insert
Add an external piece of code, video or image to the Formatted Text Module. When adding an image, it is better to use the Resource Library link [14]
- View
View blocks and invisible characters for formatting purposes
- Format
Add in standard formatting, such as underlining text, strikethrough, superscript and subscript. Clear formatting is also available here
- Table
Insert a table and change table properties through this menu
- Tools
View the source code of the text in a HTML viewer. Editing here may cause the content to be lost on save if done incorrectly, so only use this if you are comfortable with HTML
- Undo / Redo
Keyboard commands such as CTRL+Z and CTRL+Y also work to undo or redo your last change within the session
- Formats
Change your text based on predetermined designs. There are many options here bespoke to how your website has been setup. The main styling options here, aside from headers, are lead, small and blockquote:Heading 1
Heading 2
Heading 3
Heading 4
Heading 5
Heading 6
Lead
Small
Quote
- Bold / Italics
Make the highlighted text bold or italic, keyboard shortcuts CTRL+B and CTRL+I also work here
- Alignment
Align the content to the left, right, centred or justified
- Lists
Create bullet points or numerical lists through these icons. On the dropdown different styles can be chosen, such as ABC and Roman numerical lists
- Indents
Create a further indent to the right or left in text or lists
- Links
Add in a link to an internal or external page or resource through the URL. Change the text to display to the user and the title here. If navigating to another page of your website, choose a website page to link to. Change whether the link opens in either the same or different tab/window by changing the target. If the target is a new window, users will remain on your website in a different window.
When using an external URL remember to use HTTPS:// and when using a local path, start by using a forward-slash i.e. /images/sampleimage.png or /products
To link a document, upload your document to the Resource Library and take a note of the file name and extension (TestDocument.pdf for example). On the link add in the file path. For example /docs/TestDocument.pdf
- Resource Library
Add an image in from the resource library. You can determine the width and height here or highlight an image once added: resizing using the corners of the image